
Designer Secrets: Insider Container Tricks You Need to Know!

Source: Pinterest
Container gardening is a mainstay of the gardening world. There is nothing more welcoming that an array of pots next to a patio door. Containers are great for small spaces, corralling invasive species and adding some quirk and charm to a garden. But what’s the biggest designer secret, regardless of colour, composition, style or size?
Don’t stop at container gardening: move your containers into your gardens!
This instantly brings an element of the unexpected into your space. But what container and where do you put it?
Here are a few rules of thumb to help you find your own perfect spot for the perfect container.
1. The container must be pretty even when it is empty.
If you are going to choose a single container to serve as a focal point in your garden, it’s got to be gorgeous. It doesn’t have to be fancy, but it absolutely cannot be something that needs disguising by whatever is planted inside of it. (Thanks to Tara Dillard for her extensive writing on the subject.)
When I look at the empty urn in the photo below, I can’t take my eyes off of it. It has a gorgeous patina that makes me want to touch it, it’s so tactile.
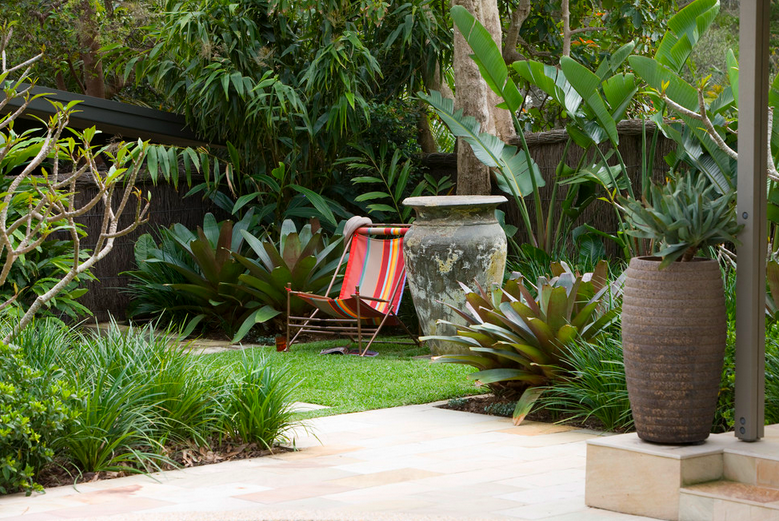
Source: Houzz
The size and scale of the urn are captivating. My eye is immediately drawn to it. The colour ties in beautifully to the trunk of the palm tree behind it, as well as the darker pot and post in the foreground. Another great thing to notice is the scale of the pot. See how the foliage around it is large and smooth textured? Because the pot is very large, probably three or four feet high, it compliments the scale of the plants around it. The weathered patina emulates the tree trunk behind it, and because it feels like it has a story, the pot adds to the sense of place. (A final word to the wise: you know how some rules are made to be broken? This isn’t one of them.)
2: The container must relate to its surroundings.
This purply/bronzy container takes on the colours of the allium, iris and lavender around it, all the while relating to the stone steps with their grey brown undertones.

Source: Houzz
Even though it is the only man made element in the composition, the container's organic shape ensures that it isn't jarring to the eye. In fact, the softly rounded sides are echoed in the allium blooms (the pom pom looking flowers). A deeper plum coloured foliage in the background adds another layer of colour that references the pot, the iris and the stone steps, even when it differs from the other flowers.
Notice how the container is raised up from the lower path? This emphasizes the pot as a focal point. Because we assume the lower path extends backwards behind us, we can infer that this pot is placed on an axis that gives us a direct line of sight to the pot and orients us in the garden.
Source: Houzz
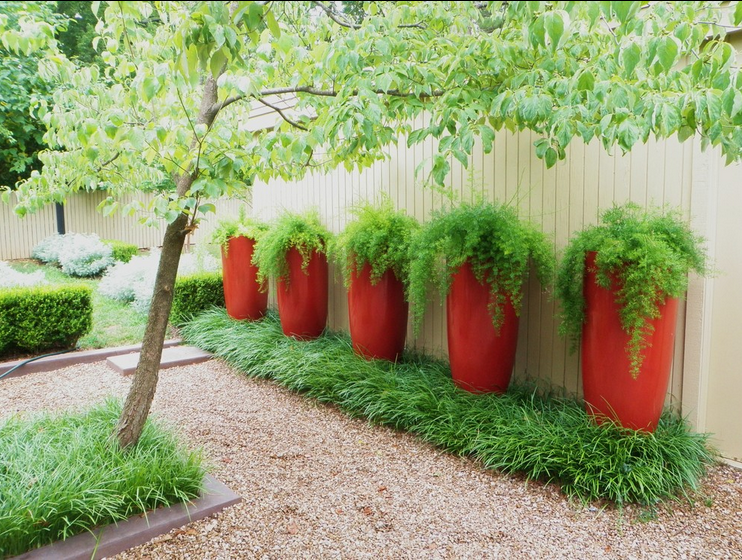
3: Move multiples to the perimeter.
‘Planting’ multiple containers along the perimeter gives a broader emphasis on a greater space than a single container as a focal point. Think about interior accent walls: they are painted a different colour from the rest of the room and draw the eye to whatever is featured in front of the wall. In the photo above, the red containers along the white fence act in a similar way as an accent wall. Because the rest of the palette is a neutral green and white, the red creates a drama and energy that is happily balanced by the repeated calming grasses and gravel path.
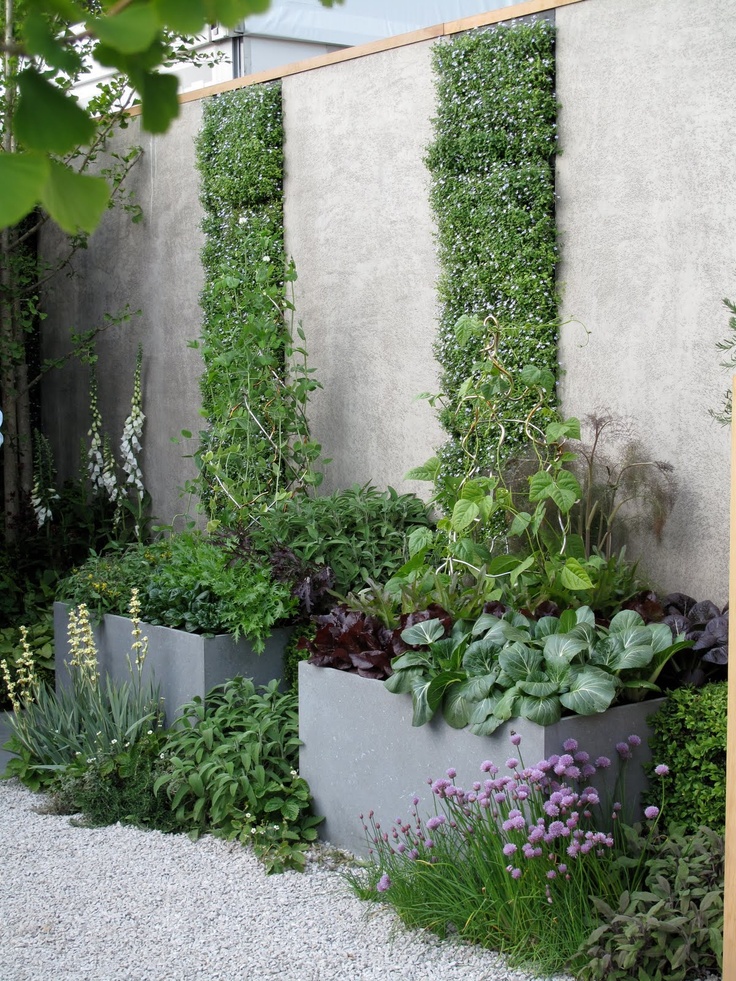
In the photo below, we have two smooth metal planters adjacent to a concrete wall arranged in such a way that the living walls seem to emanate from the planters.
Source: Houzz
These planters fade into the concrete background and allow the textures and colours of of the plants to become the accent wall. This is the reciprocal effect of the previous photo with the red planters. In that photo, the containers are the accent, and in this photo, the plants become the focal point with the containers receding into the background. Notice how in all three photos the base of containers are surrounded by greenery: lavender in the first, grasses in the second and perennials in the third. Setting the bases into plantings instantly anchors them — you don’t question their placement. They make sense: there is a logic about them that comes from ‘planting’ them. (The same rules apply to boulders, by the way.)
The two containers in the photo below are planted on the perimeter of a path in the middle of a garden. Although there are two pots, your eye treats them as a unit.

Source: Houzz
Their colour and texture cleverly echo the small stones in the path that surround the larger flagstone pieces. The containers are planted with grasses and a small woody shrub, which on its own could be boring, but here is clever. These plantings don't compete with the beautifully coloured trees beyond them and instead fade into the foreground to better accentuate the orange and yellows in the composition. This juxtaposition and forethought is rare. As we have seen, often the containers are the focal point, but in this case, the designer planned ahead and placed the containers in a way that highlights the fall foliage.
4: Mass plant your containers.
I love this photo below. It’s so bold and strong. Here the designer has used multiple sizes of the same basic shape to create a garden.

Source: Houzz
The choppy, angular outline of the bed repeats the hard angles of the containers. The mix of sizes and heights mimic a normal garden, and the repeating gravel ground cover/mulch unifies the entire bed. Shape, colour and texture are highlighted through the variety of succulents planted. I particularly like how the odd plant in the ground makes it look like one of the plants wandered out of the container and made a home in the pea gravel. Charming.
So as you start planting your containers this spring - don't forget to plant containers in your garden for instant sophistication and interest.